This tutorial helps you learn how to style HTML tables with CSS.
Tables are used for displaying tabular data, like financial reports. When an HTML table is created without any styles or attributes, then browsers display them without any border. Therefore, the appearance of your tables can be significantly improved using CSS.
CSS offers many properties that let you control the table element's layout and presentation. The following section helps you learn how to use CSS for creating elegant and consistent tables.
The CSS border property is an excellent way to define the table borders.
The below example tells how to set a black border for the table <table>, <th>, and <td> elements.
Example :
<!DOCTYPE html>
<html>
<head>
<style>
table, th, td {
    border: 1px solid black;
}
</style>
</head>
<body>

<h2>Adding Borders to Tables</h2>

<table>
<tr>
      <th>Name</th>
      <th>Email</th>
      <th>Country</th>
</tr>
<tr>
      <td>Ada</td>
      <td>ada@gmail.com</td>
      <td>UAE</td>
</tr>
<tr>
      <td>Sidney Bermudez</td>
      <td>sidney@gmail.com</td>
      <td>USA</td>
</tr>
<tr>
      <td>Tristan Sumacote</td>
      <td>tristan@gmail.com</td>
      <td>USA</td>
</tr>
</table>

</body>
</html>
By default, the browser draws a border around the table, and all the cells, with spacing in-between, resulting in the double border. However, you can collapse the adjoining table cell borders to eliminate this double border problem and create clean single-line borders.
Let's look at the example given here to understand how a border is applied to a table.
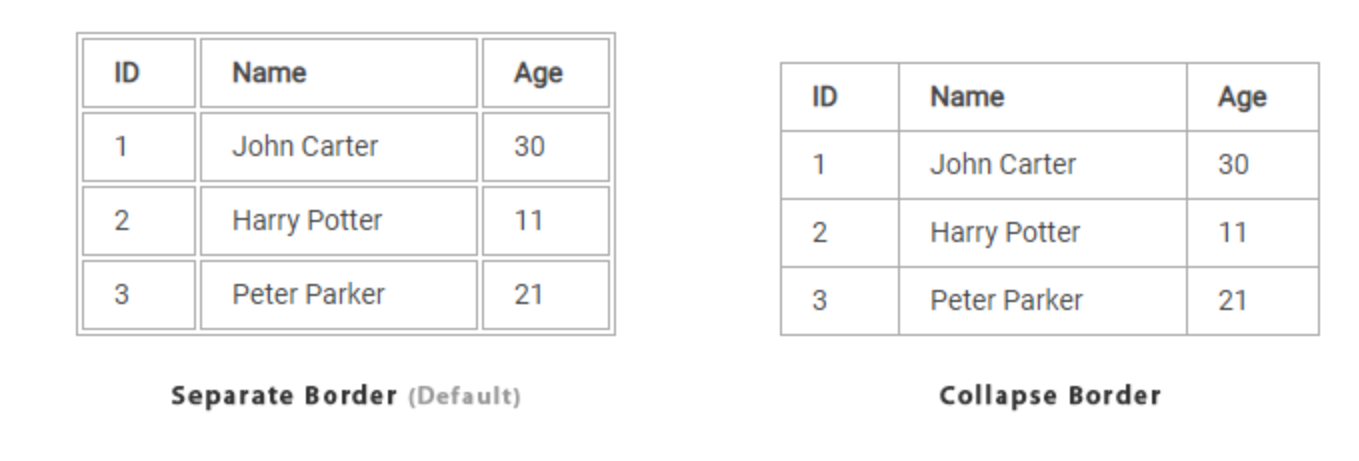
In CSS, you can set the borders on a table in two different ways: separate and collapse. The separate border model is the default model. In it, each table cell has its distinct borders. The other border model is the collapsed border model. In it, adjacent table cells share a common border. The border model can be set for an HTML table using the CSS border-collapse property.
The below-mentioned style rules will collapse the table cell borders and apply a one-pixel black border.
<!DOCTYPE html>
<html>
<head>
<style>
table {
    border-collapse: collapse;
}
th, td {
    border: 1px solid black;
}
</style>
</head>
<body>

<h2>Adding Borders to Tables</h2>

<table>
<tr>
      <th>Name</th>
      <th>Email</th>
      <th>Country</th>
</tr>
<tr>
      <td>Ada</td>
      <td>ada@gmail.com</td>
      <td>UAE</td>
</tr>
<tr>
      <td>Sidney Bermudez</td>
      <td>sidney@gmail.com</td>
      <td>USA</td>
</tr>
<tr>
      <td>Tristan Sumacote</td>
      <td>tristan@gmail.com</td>
      <td>USA</td>
</tr>

</table>

</body>
</html>Note: The space between the table cell borders can be removed by setting the CSS border-spacing property's value to 0. Although, this will only remove the space and will not merge the borders like in case when the border is to-collapse to collapse.
By default, the table cells created by the browser are large enough to contain the data in the cells.
You can add more space between the table cell contents and the cell borders using the CSS padding property. Let's use the following example to see how it works:
Example :
th, td {
    padding: 15px;
}You can also use the CSS border padding to adjust the spacing between the borders of the cells if the borders of your table are separated (which is default).
The style rules mentioned below apply the spacing of 10 pixels between all borders within a table:
Example :
table {
    border-spacing: 10px;
}By default, a table is wide and tall enough to contain all its contents.
However, the width and height of the table and its cells can be explicitly set using the width and height CSS property. In the example given here, the style rules will set the table's width to 100% and the table header cell's height to 40px.
Example :
table {
    width: 100%;
}
th {
    height: 40px;
}
As per the default behavior of a table, it can expand and contract to accommodate the data contained inside the table. As data fill inside, the table continues to expand till there is space. However, sometimes, it is required to set a fixed width for the table to manage its layout, and this can be done with the help of the CSS table-layout property. This property specifies the algorithm to be used to lay out the table cells, rows, and columns. This property takes one of two values:
The style rules in the example mentioned here specify that the HTML table is laid out using the fixed layout algorithm with a fixed width of 300 pixels. Let's see how it works:
Example :
table {
    width: 400px;
    table-layout: fixed;
}
Tip: The table rendering performance can be optimised by specifying the value fixed for the table-layout property. The fixed value of this property causes the table to be rendered one row at a time, thereby providing users with information at a faster rate.
Note: Without a fixed value of the table-layout property on large tables, users will not be able to see any part of the table until the browser has rendered the whole table.
The text content inside the table cells can be aligned either horizontally or vertically.
To align the text inside the table cells horizontally, you can use the text-align property the same way you use it with other elements. You can align text to the left, right, center, or justify.
The style rules given here will left-align the text inside the <th> elements.